
Experiencing font display issues on your Windows 10 or Windows 11 computer? Menus looking strange, text rendering incorrectly, or applications displaying odd characters? The problem might lie with corrupted or missing default fonts. Windows relies on a specific set of fonts for its user interface and core functionality. Installing new fonts can sometimes cause conflicts, accidentally delete existing ones, or lead to system instability. This guide provides you with the official Windows 10 and Windows 11 default font packs so you can easily restore your system’s appearance to its original factory settings. We’ll walk you through a simple process to download and install these essential fonts, resolving common display problems and ensuring a consistent user experience. Don’t worry; it’s easier than you think! Download the Windows 10 default fonts or Windows 11 default fonts below.
Why Restore Windows Default Fonts?
While installing custom fonts can personalize your computer, they can also create problems. Conflicts between different font types are common, and accidental deletions happen more often than you might think. Restoring the Windows 10 default fonts or Windows 11 default fonts ensures that your system uses the correct, pre-approved fonts for all applications and UI elements. This resolves issues like:
- Incorrect text rendering in menus
- Missing characters in documents
- Application crashes related to font conflicts
- A generally inconsistent user interface
Download Windows 10 Default Fonts
Need to revert your Windows 10 default fonts? The following ZIP file contains a complete backup of the original font files included with Windows 10. Download it, extract the contents, and install them as described in the steps below.
Download Windows 10 Default Fonts (Approx. 181MB) – Download
Download Windows 11 Default Fonts
Having trouble with font display on Windows 11 default fonts? This ZIP file contains the original font files that came pre-installed with Windows 11. Follow the instructions below to restore your system’s appearance. Getting those Windows 11 default fonts back is crucial for a smooth and visually consistent experience.
Download Windows 11 Default Fonts (Approx. 182MB) – Download
How to Restore Your Windows Fonts
Follow these simple steps to restore your Windows 10 default fonts or Windows 11 default fonts:
- Locate the Fonts Folder: Open File Explorer (Windows Key + E) and navigate to Download Folder.
- Remove Unwanted Fonts (Optional): If you suspect a specific font is causing issues, try deleting it. Important: If you get an error message saying “the font cannot be deleted because it’s in use,” do not force the deletion. This can cause further problems.
- Download the Font Pack: Download either the Windows 10 default fonts or Windows 11 default fonts ZIP file from above. Scan the downloaded file with your antivirus software before proceeding.
- Extract the Files: Right-click on the downloaded ZIP file and select “Extract All…”. Choose a location (like your Desktop) and click “Extract.”
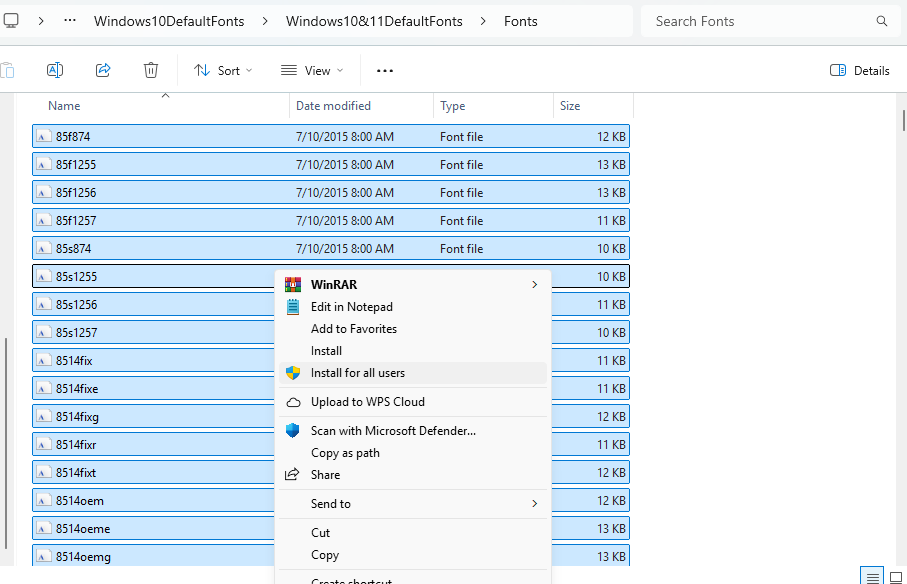
- Install the Fonts: Select all files in the extracted folder, right-click, and choose “Install for all users.” If prompted, click “Replace” for each font to ensure they are overwritten correctly.
- Restart Your Computer: Restarting is crucial for Windows to fully recognize and apply the new fonts.
Important Considerations & Disclaimer
Before proceeding, it’s strongly recommended to create a system restore point as a precaution. While this process is generally safe, unexpected issues can occur. Only download font packs from trusted sources like TechFlashes. We do not redistribute any Microsoft products or parts of the Windows operating systems. The Windows 10 default fonts and Windows 11 default fonts provided here are for fair use purposes only. Always respect copyright laws and licensing agreements related to fonts. See Permissions.. If you experience any system instability after restoring your fonts, consider running a virus scan or checking your device drivers.